---
title: Channel Form and Grid/Matrix fields
date: 2015-02-15T19:00:00-05:00
author: cc_admin
canonical_url: "https://caffeinecreations.ca/blog/channel-form-and-grid-matrix-fields/"
section: Blog
---

- [Web Development](https://caffeinecreations.ca/blog/category/web-development/), [Code](https://caffeinecreations.ca/blog/category/code/), [Tutorial](https://caffeinecreations.ca/blog/category/code/tutorial/), [ExpressionEngine](https://caffeinecreations.ca/blog/category/expressionengine/), [EE Tutorials](https://caffeinecreations.ca/blog/category/expressionengine/ee-tutorials/)
# Channel Form and Grid/Matrix fields
I was approached to build a site that is essentially a resume builder; Visitors to the site would visit and fill in a multi page form providing the details to build out their resume. I was positive that this wouldn't be an issue with ExpressionEngine as Channel Form makes it easy to create front end forms and Grid is a first party field that would allow me to have groups of fields auto duplicated for sections such as Job Experience or Education. However this turned out to not be the 100% correct.
I was approached to build a site that is essentially a resume builder; Visitors to the site would visit and fill in a multi page form providing the details to build out their resume. I was positive that this wouldn't be an issue with ExpressionEngine as Channel Form makes it easy to create front end forms and Grid is a first party field that would allow me to have groups of fields auto duplicated for sections such as Job Experience or Education. However this turned out to not be the 100% correct.
Grid does work with Channel form but it doesn't allow for customization on the front end. You can only display a grid field by using the custom\_fields tag pair like this:
```
```twig
{custom_fields}
{field_instructions}
{display_field}
{/custom_fields}
```
```
The issue with this is immediately clear in that you cannot control the layout or design of your fields. Also with a responsive site and a seven field grid, the grid is going to break out of the site as it is output as one long table row that is not responsive. Matrix stays in it's container but there is no documented way to display customly. In the screenshot below, The matrix cells and grid cells have the same width. The only difference is matrix allows the use of P&T switch rather than checkboxes
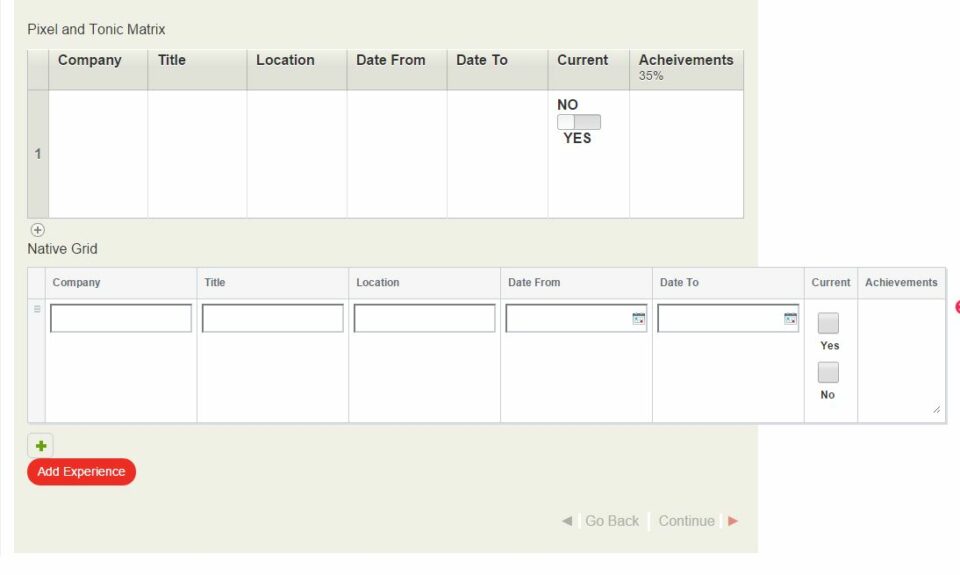
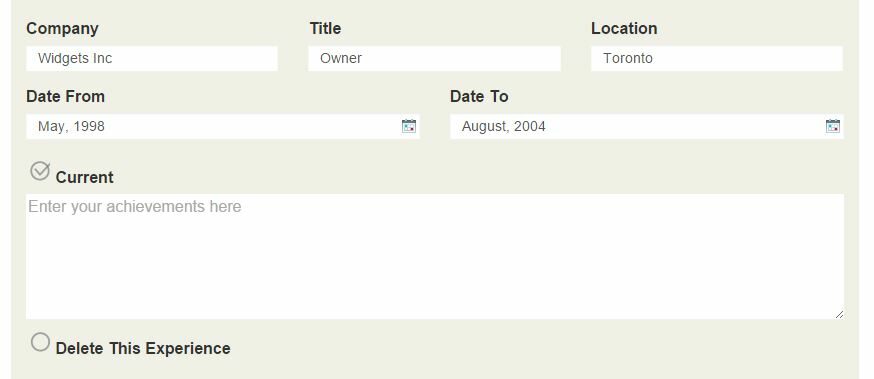
The final code will allow a custom layout like this which will rearrange itself based on the viewport size due to responsive coding.
[Meta Q](http://themetaq.com/articles/bring-matrix-data-editing-to-the-front-end) wrote a post in March 2013, [Bring Matrix Data Editing to the Front-End](http://themetaq.com/articles/bring-matrix-data-editing-to-the-front-end), that addressed this issue using Matrix and Safecracker. Safecracker was renamed to Channel form and has had some changes so I proceeeded to use this post as a guide to do what was needed.
Using that article I got everything set up, but it would only display existing data and would not save new fields. After some frustration and help from [@Lincolnpixel](https://twitter.com/Lincolnpixel), who is currently building a similar project I was able to get everything working. The key to success is to not have new fields appear immediately below existing content as in the publish page, but rather to load a new page with new fields and on save go back to the editing page. To do this I used [switchee](https://devot-ee.com/add-ons/switchee) and kept everything in the same template.
```
```html
{custom_fields}
{field_instructions}
{display_field}
{/custom_fields}
```
```
As you can see from the above code the first case displays the matrix field for editing based on the url\_title and entry\_id being passed through a [low variable](https://devot-ee.com/add-ons/low-variables) (see my blog post on [how I use Low Variables](/blog/why-you-should-use-low-variables-on-your-expressionengine-builds)) using preparse. Additionionally it is required to wrap the channel:form tag with channel:entries in order to display saved data. When clicking the "Add Experience" button it goes to the same page but adds a new segment /add/ which then loads up the page for adding new content to the matrix field. There is no need for a channel:entrires on the "add" page as we are creating new data.
To display the content of each matrix row correctly requires poking around the database and getting the column\_id for each cell in the Matrix as you are unable to use the cell\_name to call the data. You can find the column ids by opening your database and then going to the exp\_matrix\_cols table and looking at the first column - match that up with the field name in col\_name and add your fields like this replacing "x" with the correct id:
```
```html
```
```
On the "add" page the fields need to be called using the same formula above, however since we are creating new rows instead of
**row\_id\_{row\_id}** we use row\_new\_0.** Additionally there are two new hidden fields required.
```
```html
```
```
In the above code replace **field\_name** with the name of your field. The first hidden field creates a new row and saves it when we submit the form with the help of the javascript from the Meta Q article (will post further down). The second hidden field using the url\_title to ensure that data is added to the correct entry. In my case this is in segment\_4 and is being passed through low\_variables as **{pre\_seg\_4}.**
I found that date fields using the native date field type were not working as expected so I used plain field types and used jQuery UI datepicker to. To do this you will need to get a custom jQuery UI theme if you don't want your datepickers to look like the publish page datepickers. Also the regular datepicker shows days and in a resume the date is usually unecessary so my code set's it to pick only the month and year.
HTML
```
```html
```
```
JS/CSS
```
```javascript
```
```
The Javascript code, unchanged from the Meta Q article, that creates the new row is here. Lines 18-32 are probably unecessary as we are no long creating new rows on the edit page but rather creating new rows on separate page due to that not working at all.
```
```javascript
```
```
### Bug Fix
There is [one bug fix](https://support.ellislab.com/bugs/detail/20335/channel-form-problem-with-multiple-complex-fields-in-the-same-form) that will need to be applied to your ExpressionEngine install if you have more than one matrix field in the same channel. This needs to be applied whether both matrix fields are on the same page (on the front end) or not. If you only have one matrix field then it is not necessary.
**File:** system/expressionengine/modules/channel/libraries/channel\_form/Channel\_form\_lib.php **as of EE 2.9.2 line 3257**
**Method:** replace\_tag
Find This:
```
```php
ee()->api_channel_fields->apply('_init', array(array(
'row' => $this->entry,
'content_id' => $this->entry('entry_id')
)));
```
```
Replace with This
```
```php
$field_id = $this->get_field_id($field_name);
ee()->api_channel_fields->apply('_init', array(array(
'row' => $this->entry,
'content_id' => $this->entry('entry_id'),
'field_id' => $field_id
)));
```
```
### Final Thoughts
We now able to view/edit matrix rows as well as add a new row as necessary. Adding a new row is not as elegant as in the backend due to having to load a new page. However that loss of elegance is more than mitigated by the fact that we can now display all our matrix cells as we want them to look and are not limited to the tabular layout/look of the Control Panel matrix/grid.
You could likely use a modified version of this with the first party grid field, but there would be need to experiment with how content is added and checking the database. Until EllisLab adds additional tags to allow customized display of grid fields, the best approach in my opinion is using Matrix with the above code.
My full template with all seven matrix cells is [here](http://pastie.org/private/vw8qwcxp7cckc2indekjya).
### Update March 12, 2015
[Andrew Armitage](https://twitter.com/aarmitage) has written a post on [how to do this with the native grid field type](https://adigital.agency/blog/responsive-grid-fields-in-expression-engine-in-channel-form).